Deployment

With a customized PowerShell script, the IT administrator can deploy the Client (portable version) to all target workstations/OS/VMs. The IT administrator can set up the Server and Client on the same port before deploying all clients.

The client installation package is all you need for a batch deployment. It includes the following major components:

  • Client Connection File (client.connection)
    The IT admin can edit the IPv4 and port from this file via CCM to point to the Server. Then deploy this file along with the Client.
  • Banner (banner.exe)
    It will display on the screen based on settings from the server -> settings -> group -> screen.
  • Client (client.exe)
    It will ping the server via a socket default TCP port: 56789, the IT admin needs to exempt the port prior to deployment.
  • Client Config Manager (CCM or ccm.exe)
    The IT admin can deploy this file along with the Client if the goal is to dynamically update the user profile’s security group via a CLI command. (Refer to CCM for more use case examples)
Cyber Intel Classification Banner - Software Upgrade
The example PowerShell script is located in client/tools/updater.ps1 and server/deployment/updater.ps1. (Start from the bottom right fig. to the bottom left fig.)
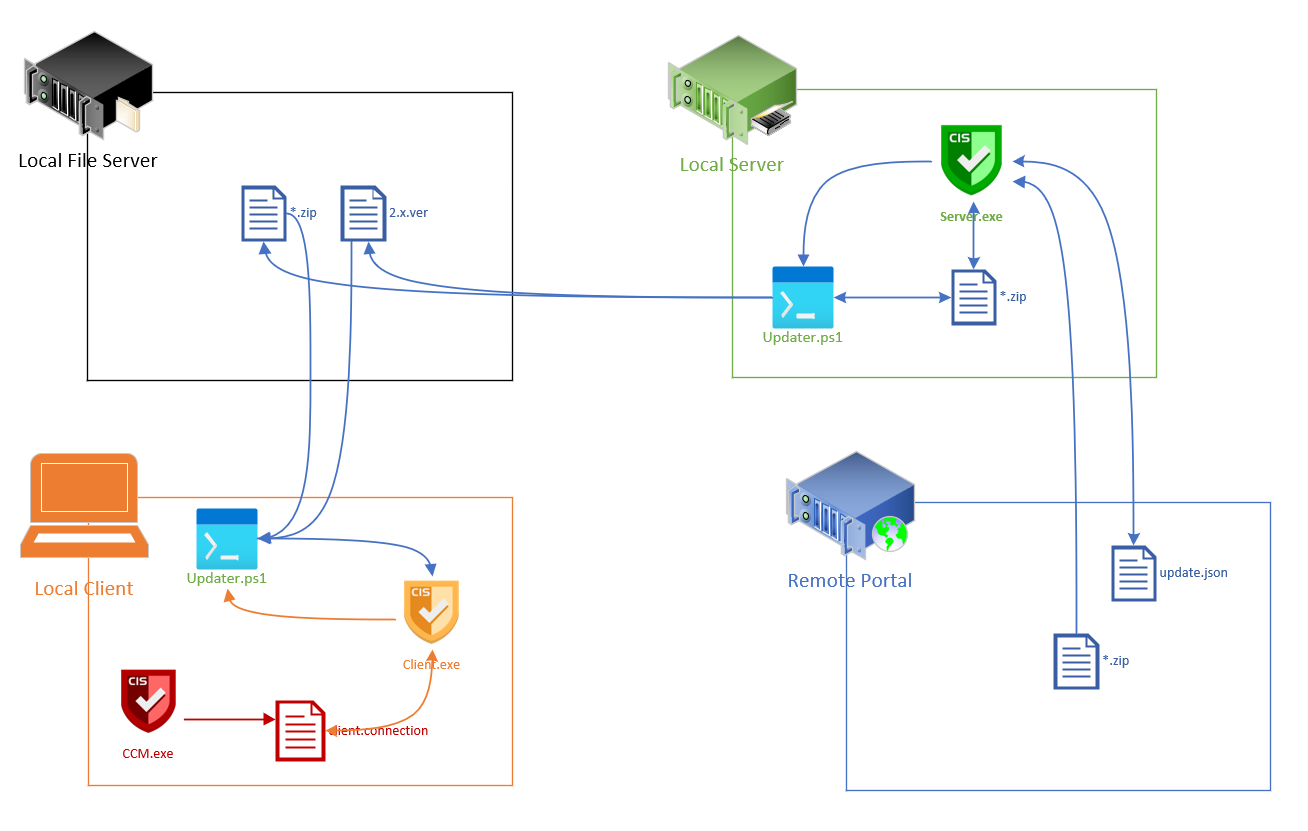
NOTICE: from the fig. above, both Updater.ps1 scripts already exist under both the Client package and Server package.

Client Side

  1. Single Deployment with Mapped Network Share Drive
    1. Map the shared drive to the client’s computer.
    2. [CLINET COMPUTER] Open CCM.exe, then config the update path, and save it.
    3. [CLINET COMPUTER] The client will start to install/upgrade to the latest version.
      Notice: IT admin may use the “Client ID” option to test the deployment for a single computer before the batch deployment.
  2. Batch Deployment without Mapped Network Share Drive
    1. IT admin can use any script (such as PowerShell) to trigger the Client deployment.
    2. The Client will trigger the Updater.ps1 to compare the local version with the remote version: (the remote version means a version located on your LAN server)
    3. If the remote version is greater than the local version:
      a. Download the package. (using the package name from the update.json file)
      b. Save the package to <client-installation-path>/deployment/*.zip.
      c. Extract files from the package.
      d. Change Client and version file.
      e. Clean up all temporary files.
    4. Else:
      Notify the user the software is deployed.

Server Side

  1. Write and configure a local executable script via PowerShell (.ps1).
    NOTICE: an Updater.ps1 sample script is provided under the <server-installation-path>/Deployment/Updater.ps1
    • Make sure the script can copy the downloaded installation/upgrade package from <server-installation-path>/deployment/*.zip to your target network mapped drive (e.g. \\LAN-server-NetBIOSname\cicb\*.zip)
  2. Download the JSON file, it will overwrite the existing JSON file.
  3. Parse the JSON file and get the version and package name from it.
  4. Compare the local version with the remote version.
    • If the remote version is greater than the local version:
      a. Download the packages. (using the package name from the update.json file)
      b. Save upgrade packages to <server-installation-path>/deployment/*.zip.
      c. Extract files from the packages.
      d. Upgrade Server and version file.
      e. Clean up the temp. deployment files.
    • Else:
      Notify the user the software version is up to date.

Server License File (.license)

Refer to the user manuals with the keyword: license. The IT admin can change the Server port to your desired port.


Manual Upgrade Software

Client Side

  1. Download the latest client installation package from the portal.
  2. Stop the current running client.
  3. Back up “client.connection” file, and “group.settings” file.
  4. Install the client with admin permission and replace the new “client.connection” file with the backup one.

Server Side

  1. Download the latest service agent installation package from the portal.
  2. Stop the currently running agent.
  3. Back up “server.db” file and “<agent-id>.license” file.
  4. Install the agent with admin permission and replace the new “server.db” file and “<agent-id>.license” with the backup files.

Deploy Software Portal

There is no need to deploy from the user side; the “Software Portal” will be upgraded and maintained by CYBER INTEL SYSTEMS. Also, there is no plan to provide this part to any 3rd party for their LAN deployment yet.